Showing posts with label accessories. Show all posts

Monday, December 12, 2011

White Elephant wristlet


I've got plans to make about two or three more of these types of bags, based off of A Lemon Squeezy Home's tutorial. I've only got this one completed so far, but thought I'd share now just in case anyone is interested in using the tutorial. I added a strap so that the bag could be a wristlet, which is more portable in my mind than just a clutch.

I made this one for the white elephant gift exchange at work. The owner of my company (male) got it, and I felt a little bad that he ended up with it. But he said that he'd plan to use it to hold his tees when he goes golfing. Go figure.


Sunday, December 11, 2011

Rosey rosettes


Hi all!

My name's Juliet and I blog over at The Crazy Gypsy Chronicles. It's been so good to see everything that people have been making this year, I've been learning and being inspired so much!

This Christmas I had grand plans of making ALL of my Christmas pressies, but being a beginner crafter/sewist/everything I haven't been so successful.

However, I have made these sweet little shoe clips/ brooches for my boyfriend's family's Secret Santa. Each couple brings one girl gift and one boy gift as a surprise pressie for another family member. Given the size of his family, this is a good plan!

These were so simple to make and are budget friendly. To make these you need:

- Shoe clips/ clip on earring bases (I used these as my local bead shop had no shoe clip bases in stock)
- Fake flowers, leaves optional
- Craft glue
- Wire cutters


Step 1: Using the wire cutters, snip your flowers from their stems, as near to the base as possible. I tried scissors, then a stanley knife but wire cutters made this a cinch.

Step 2: If you want to add leaves, pick some pretty ones and snip these with a bit of a stem.

Step 3: Cover the base of your clip with craft glue, and arrange the leaves and flower head on top. Press it down firmly and check to see if the stick is going to be good and strong. I'm afraid I have no photos of this stage as I was, being a clumsy person, covered in craft glue and dared not to touch my man's expensive camera with sticky fingers.

Step 4: Leave the flower clips, upside down, overnight to dry.


And you're done! Wrap prettily and gift away!

I hope that this inspires some of you - these would be excellent stocking fillers and are so quick to put together they would make great last-minute gifts too!

Happy Christmas crafting all!

Saturday, December 10, 2011

A clutch and two wallets

Hi, it's Aleah from no time to sew. I've finished a few gifts! Having sewn garments exclusively for a while, I'd kind of forgotten how quickly little bags/pouches go together (and how little fabric they use), and I was able to finish these three things in two evenings - crazy (for me, anyway)! First I have gifts for my interns at work, both from both from terrific tutorials from Noodlehead:

The top one (for my female intern) is the gathered clutch, a fun take on a regular zipper pouch that is really pretty and not really much more effort. I added a removable wrist strap by sewing a tab with a d-ring into the side seam and attaching a strap to a tiny dog clip. Her favorite colors are purple and black, so I was glad to find this fabric. The bottom item (for my male intern) is the zippy wallet. I love the pearl snap on the little tab! I added a key ring in case he wants to clip it to his keys or belt. It's so hard to find adult-male-appropriate fabric, but I like this plaid. It's a thin shirting, but I interfaced it with a sturdier interfacing. Check out all the other great tutorials at Noodlehead if you need a last-minute quickie gift!
I also made this wallet for my mom:

The pattern is this one from Dixie DIY. I made just a couple changes - I used a magnetic snap rather than a button/loop, only put in one money pocket, and I made my zipper pocket the same way as on my messenger bag instead of how she instructs. I love this fabric!
So that's all for now, but I hope I can keep up this pace for a while longer and have some more things to share soon. Happy Making!

Friday, December 9, 2011

A -Slightly Psychedelic- Pompom Wreath

Only 2 weeks to go...!

Elisalex here, howdy!  With the majority of my presents done and ticked off the list, I'm now turning my attention to decorating...


For some reason, traditional Christmas Wreaths have always felt a little morbid and ominous to me.  Dark, spiky and somewhat reminiscent of funerals.  Beautiful, but depressing.  But then I saw this Pompom Wreath, and this tutorial from JCasa*Handmade, and I knew what I had to do.


For the wreath's structure I used some foam tubing from the hardware store and a coat hanger to create the shape -


Then made a bunch of pompoms in my favourite reds-dusty pinks-off whites colour combination and tied them securely onto the foam tubing.  To finish I wound around some woodland mushroom fairy lights I had (which I think look a little too acid-y when switched on, but perfectly cute -and innocent- left off) and attached a grosgrain ribbon loop so it can be hung. 


But no way is this wreath getting hung outside... I've become very fond of its sweet, not at all morbid or ominous, and very soft self.  I couldn't possibly risk it getting rained on or stolen, and most of all I want it inside where I can appreciate it.

Wednesday, December 7, 2011

Bags, bags, bags! (and tutorial links)

Hello fellow Christmas Crafters. This is Andrea from Stitch Parade checking in with an update on my pressie making progress thus far. I must confess it’s been great reading about your own progress and I’ve been inspired by the great present ideas you’ve all had.

With less than 3 weeks to go, I’m about 80% done but it’s been raining cats and dogs in Toronto for days so I’ve not been able to get pictures of all my makes. Today I’ll show you what I’ve got so far in the bags department. First up, toiletries bags for my dad and brother:


I learned to make these bags a couple years ago at The Workroom, a local sewing studio, but the process is super easy and I even fund an online tutorial for you over here. For these bags I was able to up-cycle wool materials from hardly worn trousers I rescued from a friend’s Goodwill pile. I figured the look was manly enough. What do you think?


For the ladies I made clutches using a pattern also from The Workroom. I used some leather scraps for two of them, quilting cotton for another two, and the leftover embroidered border denim from my Ginger skirt for the last one.


All bags, except for the leather clutches, are interfaced for structure, include an internal pocket, and are also lined with contrasting cotton fabric for a fun pop of colour.


If you are interested in making similar clutches I found this handy tutorial here. As an FYI, the frames can be bought from several vendors via etsy.


Hopefully we get some sunshine this coming weekend so that I can photograph some of the other presents I’ve made. Wishing you all days of absolute present making productivity over the next couple of weeks!

Messenger Bag Tutorial

Hi, I'm Aleah and I blog at no time to sew. I'm getting a bit of a late start on my Christmas crafting, mostly because I've been working on a production of A Christmas Carol since October so I've been practicing Holiday Avoidance in my personal life... but now I'm starting to get really excited about making presents so I'm kicking into gear!
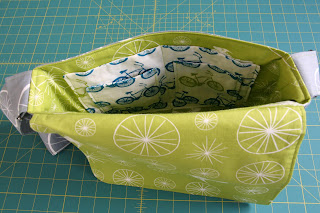
I've just posted a tutorial for a small messenger bag, and I wanted to share it here for anyone with a bike commuter/bike lover in their lives, or just anyone who wants a cute adjustable-strap messenger bag! Here's a look at my design - it's got a three panel front with a pocket, and a bunch of internal pockets.

The full tutorial is here. Happy Making!

Monday, December 5, 2011

Refashioned Sweater to Skirt

Hello, Holiday Crafters!  My name is Seeks, and this is my first post here for the Crafty Christmas Club. I am a blogger who's interested in a number of things, so my blog ranges in posts from sewing to art to food. I'm starting to pick up some sewing momentum of late, so I am happy to have a chance to contribute here. I just finished one of my first present projects and really need to show it off somewhere before I spoil the surprise! Thank goodness you're here to save me from blabbing!


I had a sweater that both my cousin and I loved, but just never wore. It had a few holes in key places that just didn't make it wearable to most outings.

So, for Christmas, I thought I'd refashion it into something I knew she would wear: a cute knit skirt and leg warmers. The nature of the knit and ribbing of the sweater was perfect for the refashion because it wasn't itchy, and the V-neckline stretched just enough to serve as a perfect waistband. A nice detail on the skirt, as I've not seen many v-waisted skirts.


I used the sleeves for the leg warmers, and the top curved portion of the sleeves to make the pockets (one kangaroo pouch on front, one small pocket on the back). My cousin loves pockets, so I am excited by their addition.


I used a blanket stitch on the raw edges of the leg warmers, and they stay up quite well without the addition of any ties.


They're a little loose at the top, but that doesn't seem to compromise their hug elsewhere. My hope is that they'll spring back after a wash.

The pockets were sewn with some embroidery thread "X"'s at the corners to help keep the bulk of the inner sewn edges from sticking out.

Hope you like it!

You're welcome to check out my blog for other stuff I'm working on. Most of my good stuff will be showing up here in the next month though, as most of my projects are gifts at the moment.

Wednesday, November 30, 2011

Tissue Holders and a Tea Cozy

Hello friends! It's Lindsay from LindsayPindsay checking in with my progress.  I’ve been diligently working on my gift list and am happy to report that I have completed the tissue holders and tea cozy.

The tissue holders will be stocking stuffers. I like to sneak something handmade into the stockings that I have access to on Christmas Eve and Christmas Day. This year this includes 15 stockings, so I had to choose wisely. I used the JCasa tutorial from Sew Mama Sew and wowie were they quick to put together! I had these cut and sewn within 2 hours! I highly recommend an assembly line if you’re going to tackle large quantities of the same product.

Tissue Holders

I love this Jay McCarroll fabric. I have a bunch of large scraps leftover and am thinking that they would work nicely on a child’s quilt for a local charity. Because I need to add another thing to my list!

I also finished a quilted tea cozy. This lovely cozy will be going to the host of our annual cookie exchange, who also happens to be my former viola teacher! She taught me from 3-12th grade and I’m so glad we are able to stay in touch. I used the Retro Mama pattern to assemble the cozy but I came up with the patchwork pattern on my own. She includes some great patchwork suggestions with the pattern but the size of my scraps just weren’t going to work. I took to Excel and came up with this simple design. This was my first try at designing my own patchwork pattern, and after the cozy was finished I realized that I should have accounted for the seam allowances as much of the red fabric on the top is cut off. Next time!

Patchwork Tea Cozy

I am still pleased with how this turned out. I added an extra layer of insulation to make sure that the cozy is extra cozy. I had some drapery liner in my stash for reasons unknown (I think I picked it up for something out of the remnant bin at Joann), so I added that to the quilt sandwich, which included a layer of batting.

Patchwork Tea Cozy

I have been in love with all of the horizontal quilting that I’ve seen lately, so that’s what I went with. And I love how it looks even if it did take quite a while to stitch all of those lines!

Patchwork Tea Cozy

I highly recommend the Retro Mama pattern. It is really easy to understand and results in a sturdy and reversible tea cozy.

Monday, November 28, 2011

Turk's Head Knot Bracelets

Hi everyone!  Karen here from Renegade Homestead.  It's not even the end of November and I'm knocking out presents left and right (granted, I'm a dog walker so it could be that I have more time on my hands than most crafters).  Today I finished a few Turk's head knot bracelets for my college girl friends.  


I used this tutorial and found that each one took about 20 minutes.  Perfect for stocking stuffers and easily accomplished in front of the TV.  

And I have to share this - the funniest thing happened while I was taking pictures of the finished bracelets!  See anything out of place in the picture below?


That would be a wild turkey on the right.  A whole flock of them wandered into my photo shoot!


Happy to see there were some survivors from Thanksgiving right in my own backyard.  To anyone who celebrated it last week, I hope your holiday was as good as theirs!