Showing posts with label tutorials. Show all posts

Saturday, December 10, 2011

A clutch and two wallets

Hi, it's Aleah from no time to sew. I've finished a few gifts! Having sewn garments exclusively for a while, I'd kind of forgotten how quickly little bags/pouches go together (and how little fabric they use), and I was able to finish these three things in two evenings - crazy (for me, anyway)! First I have gifts for my interns at work, both from both from terrific tutorials from Noodlehead:

The top one (for my female intern) is the gathered clutch, a fun take on a regular zipper pouch that is really pretty and not really much more effort. I added a removable wrist strap by sewing a tab with a d-ring into the side seam and attaching a strap to a tiny dog clip. Her favorite colors are purple and black, so I was glad to find this fabric. The bottom item (for my male intern) is the zippy wallet. I love the pearl snap on the little tab! I added a key ring in case he wants to clip it to his keys or belt. It's so hard to find adult-male-appropriate fabric, but I like this plaid. It's a thin shirting, but I interfaced it with a sturdier interfacing. Check out all the other great tutorials at Noodlehead if you need a last-minute quickie gift!
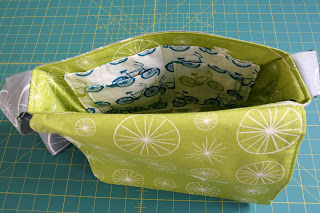
I also made this wallet for my mom:

The pattern is this one from Dixie DIY. I made just a couple changes - I used a magnetic snap rather than a button/loop, only put in one money pocket, and I made my zipper pocket the same way as on my messenger bag instead of how she instructs. I love this fabric!
So that's all for now, but I hope I can keep up this pace for a while longer and have some more things to share soon. Happy Making!

Friday, December 9, 2011

A -Slightly Psychedelic- Pompom Wreath

Only 2 weeks to go...!

Elisalex here, howdy!  With the majority of my presents done and ticked off the list, I'm now turning my attention to decorating...


For some reason, traditional Christmas Wreaths have always felt a little morbid and ominous to me.  Dark, spiky and somewhat reminiscent of funerals.  Beautiful, but depressing.  But then I saw this Pompom Wreath, and this tutorial from JCasa*Handmade, and I knew what I had to do.


For the wreath's structure I used some foam tubing from the hardware store and a coat hanger to create the shape -


Then made a bunch of pompoms in my favourite reds-dusty pinks-off whites colour combination and tied them securely onto the foam tubing.  To finish I wound around some woodland mushroom fairy lights I had (which I think look a little too acid-y when switched on, but perfectly cute -and innocent- left off) and attached a grosgrain ribbon loop so it can be hung. 


But no way is this wreath getting hung outside... I've become very fond of its sweet, not at all morbid or ominous, and very soft self.  I couldn't possibly risk it getting rained on or stolen, and most of all I want it inside where can appreciate it.

Wednesday, December 7, 2011

Bags, bags, bags! (and tutorial links)

Hello fellow Christmas Crafters. This is Andrea from Stitch Parade checking in with an update on my pressie making progress thus far. I must confess it’s been great reading about your own progress and I’ve been inspired by the great present ideas you’ve all had.

With less than 3 weeks to go, I’m about 80% done but it’s been raining cats and dogs in Toronto for days so I’ve not been able to get pictures of all my makes. Today I’ll show you what I’ve got so far in the bags department. First up, toiletries bags for my dad and brother:


I learned to make these bags a couple years ago at The Workroom, a local sewing studio, but the process is super easy and I even fund an online tutorial for you over here. For these bags I was able to up-cycle wool materials from hardly worn trousers I rescued from a friend’s Goodwill pile. I figured the look was manly enough. What do you think?


For the ladies I made clutches using a pattern also from The Workroom. I used some leather scraps for two of them, quilting cotton for another two, and the leftover embroidered border denim from my Ginger skirt for the last one.


All bags, except for the leather clutches, are interfaced for structure, include an internal pocket, and are also lined with contrasting cotton fabric for a fun pop of colour.


If you are interested in making similar clutches I found this handy tutorial here. As an FYI, the frames can be bought from several vendors via etsy.


Hopefully we get some sunshine this coming weekend so that I can photograph some of the other presents I’ve made. Wishing you all days of absolute present making productivity over the next couple of weeks!

Messenger Bag Tutorial

Hi, I'm Aleah and I blog at no time to sew. I'm getting a bit of a late start on my Christmas crafting, mostly because I've been working on a production of A Christmas Carol since October so I've been practicing Holiday Avoidance in my personal life... but now I'm starting to get really excited about making presents so I'm kicking into gear!
I've just posted a tutorial for a small messenger bag, and I wanted to share it here for anyone with a bike commuter/bike lover in their lives, or just anyone who wants a cute adjustable-strap messenger bag! Here's a look at my design - it's got a three panel front with a pocket, and a bunch of internal pockets.

The full tutorial is here. Happy Making!

Saturday, December 3, 2011

Smokey barbeque sauce

Well howdy partners! Stitchybritt back here to show y'all how to make-up some super smokin' barbeque style sauce.  It's really quite easy, just involves a lot of chopping and smoking up your kitchen a bit.  Are you ready?  Let's go!


You are going to need:
1kg of tomatoes
1 red capsicum
1 onion
2 chillies
3 garlic cloves
worstershire sauce
vinegar
brown sugar
tea (yes, tea!)
a selection of spices (my mix has cinnamon, peppercorns, star anise, chilli flakes, fennel seeds - but you can use whatever is your cupboard really)


Ok, so the first thing you need to do is to get some kitchen foil and make a little bowl shape, like this:


You're going to put a few tablespoons of tea leaves and about a tablespoon of each of your spices in the little foil bowl (it's not an exact science) and put this in the bottom of your saucepan.  Straight onto the bottom - no oil or anything else.  This is going to be where the smokey goodness comes from.

Next, roughly chop your onion and capsicum into large chunks and put them in a steamer basket in the saucepan on top of your smokey mix.  Throw the chillies and the garlic cloves in there too.  Now - put the lid and the heat on!  It shouldn't take long before the spices start smoking your vegetables.  You probably want to smoke them for about 10-15 mins.


This is probably a good time to open your windows, or you might smoke out your kitchen!


As this is going on you can start to dice your tomatoes, and pop them aside until a little later.

Now that your veggies are totally smoked you need to chop them very finely (see I told you - lots of chopping).  You don't need your spicey smokey mix anymore so this can go in the bin.  Take your finely chopped veggies and give them a bit of a fry in a little oil.

Next, add your diced tomatoes.  Cook them until the sauce is looking all pulpy.  It's smelling good, isn't it?


Next add a good slosh of worstershire sauce and an even bigger slosh of vinegar (about half a cup?).  Also stir in 3 tablespoons of brown sugar.  Obviously, these measurements (if you can call them that) are estimates; your sauce will still end up good with a little more or a little less of these ingredients.  Let the whole lot simmer for around 25 mins.  Then you're ready to bottle it up!

Fill your hot sterilized jars with your sauce and screw the lids on.  And there you have it!  Smokey barbeque sauce!


Of course you might want to put some cute 'hats' on them to pretty them up, and I'm thinking of making some cowboy themed labels.  Yee-har!

This sauce is best kept in the fridge.  If you live in a colder climate it should be fine to be kept out until you give it as a gift, but if you're about to encounter some 30+ degree days (like here in Sydney) I recommend keeping your jars in the fridge until they're ready to give.

Enjoy!


Stitchybritt xx